Meal Combining
Configuration > Point of Service > Meal Combining
Meal Combining is used for customers that will enter each item on a student's tray at the POS and/or for pre ordering. TITAN uses the meal combining configuration to determine which combinations of items qualify as reimbursable meals.
Meal Combining Screen
-
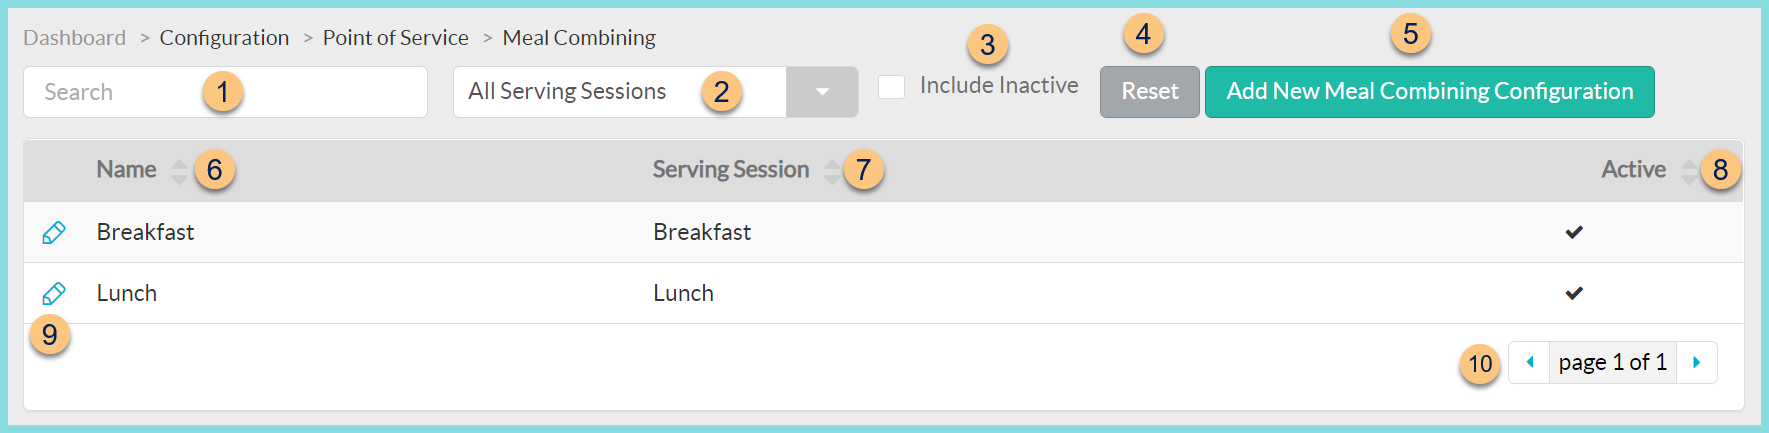
Search - search by name
-
All Serving Sessions - filter by serving session
-
Include Inactive - check to include inactive records
-
Reset - click to reset search parameters
-
Add New Meal Combining Configuration - click to add a new meal combining configuration
-
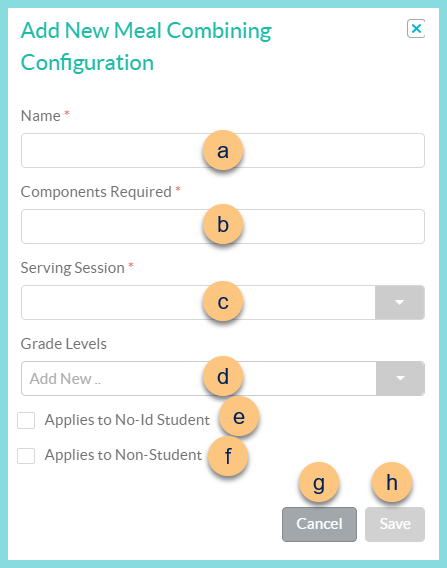
Name - enter a name
-
Components Required - enter the number of meal components required for a reimbursable meal (Note: Lunch = 3, Breakfast = 1 or 2 depending on district's menu)
-
Serving Session - select serving session to which this configuration applies
-
Grade Levels - select the grade levels for which this configuration applies
-
Applies to No-Id Student - check to indicate that this configuration will be applied to No ID Student transactions
-
Applies to Non-Student - check to indicate that this configuration will be applied to Non-Student transactions
-
Cancel - click to return to the previous screen without saving changes
-
Save - click to be redirected to the individual meal combining configuration screen
-
-
Name - click to sort by name
-
Serving Session - click to sort by serving session
-
Active - click to sort by active status
-
Pencil - click to be redirected to an existing individual meal combining configuration screen
-
< > - click to scroll through pages
Individual Meal Combining Configuration
-
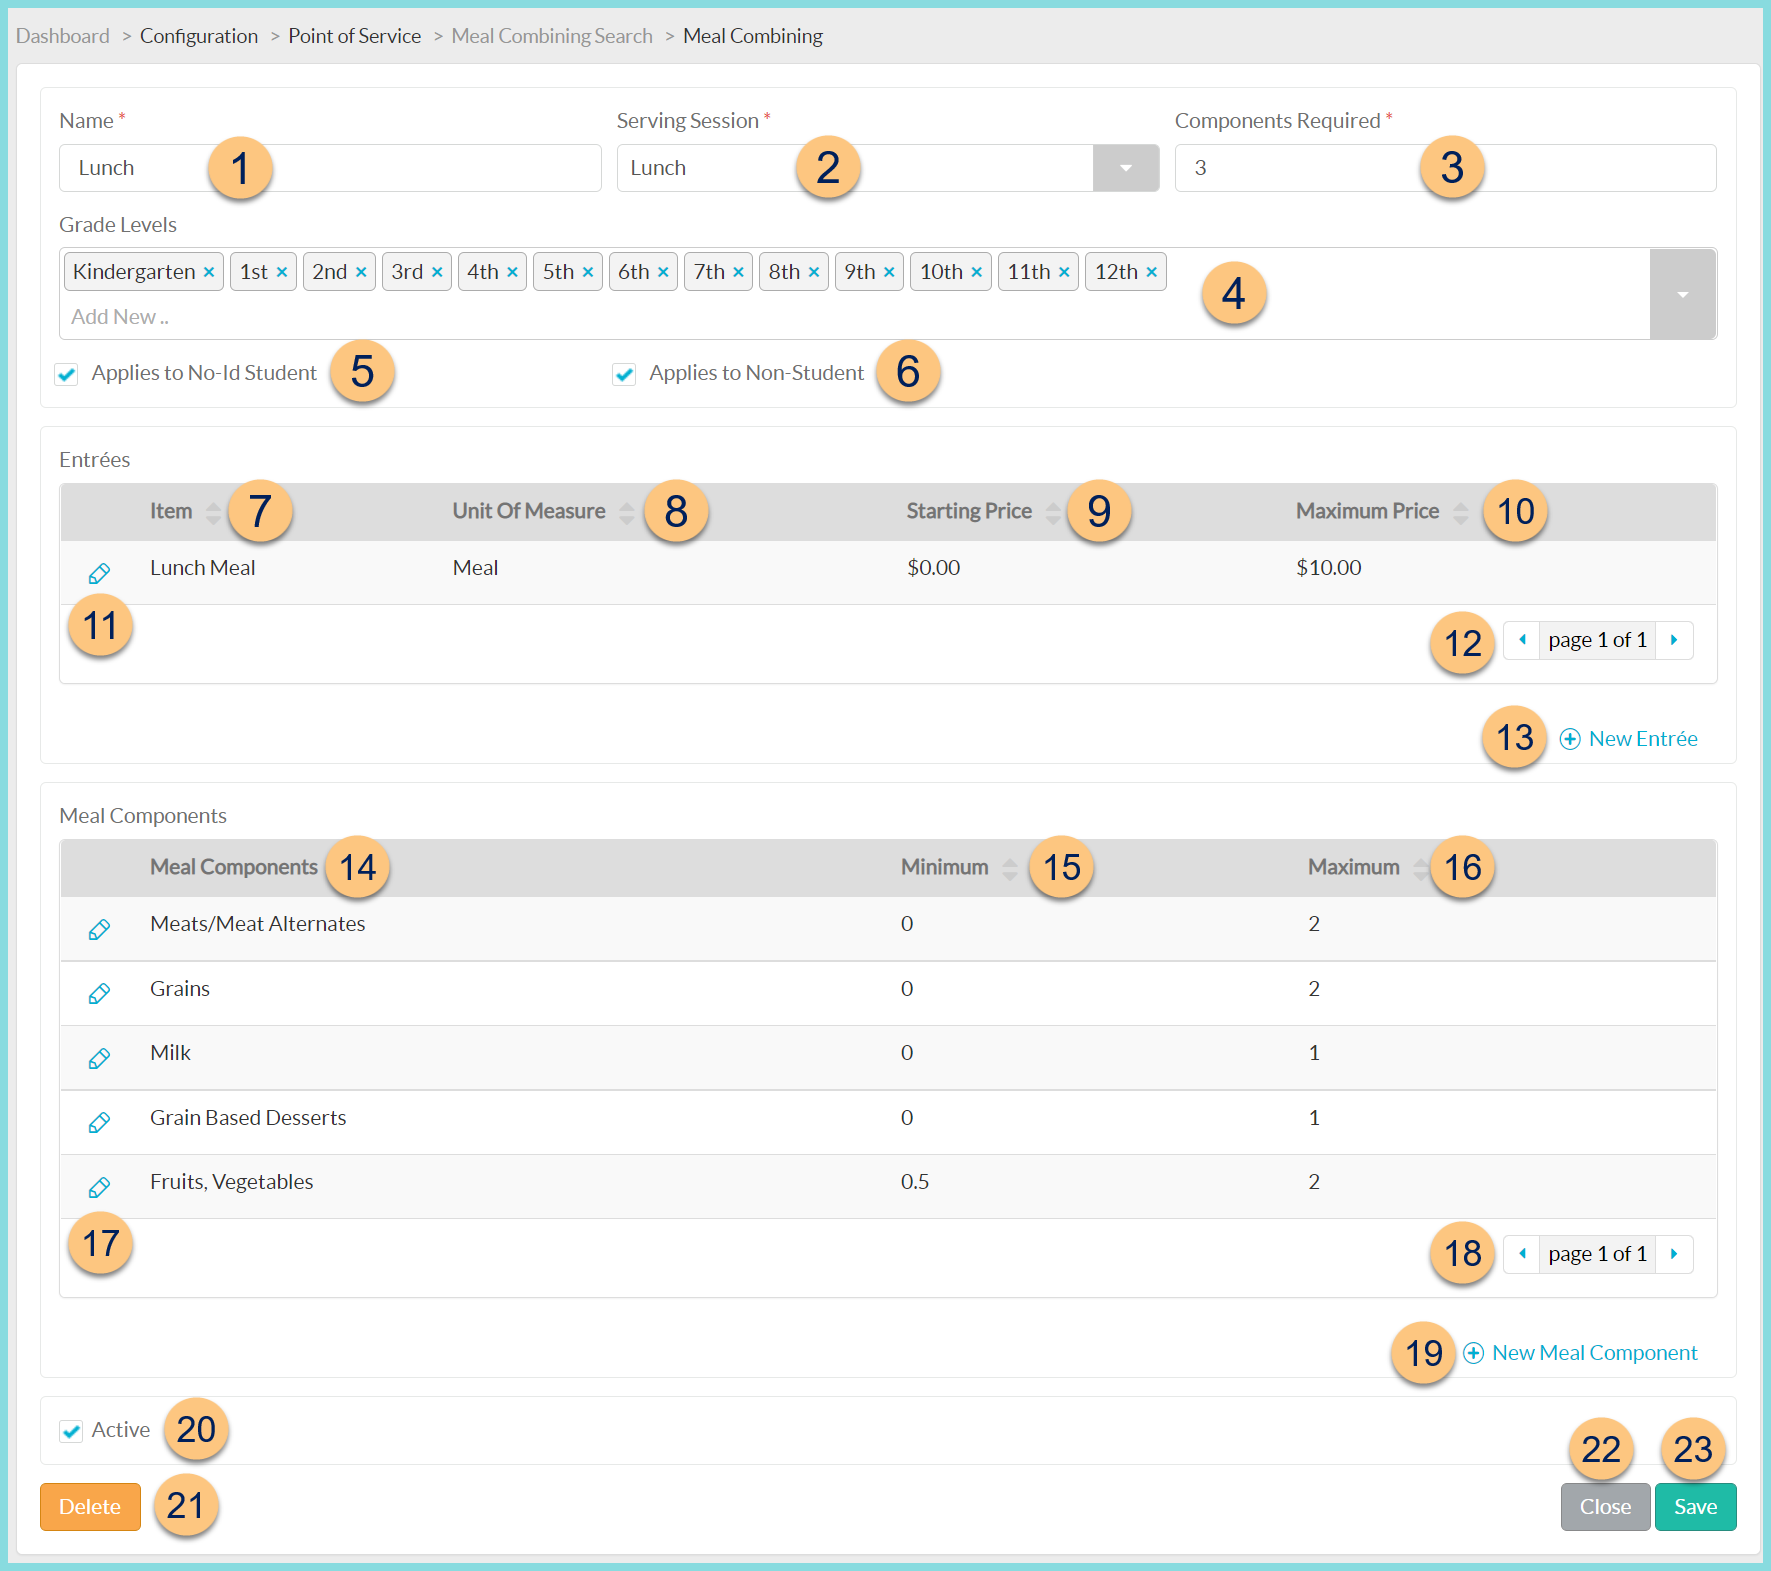
Name - change name if needed
-
Serving Session - select the serving session to which this configuration applies
-
Components Required - enter the number of meal components required for a reimbursable meal. (Note: Lunch = 3, Breakfast = 1 or 2 depending on district's menu)
-
Grade Levels - select the grade levels for which this configuration applies
-
Applies to No-Id Student - check to indicate that this configuration will be applied to No ID Student transactions
-
Applies to Non-Student - check to indicate that this configuration will be applied to Non-Student transactions
-
Item - click to sort by sales item name (This is the item that will automatically rung up if the criteria are met)
-
Unit Of Measure - click to sort by unit of measure
-
Starting Price - click to sort by starting price
-
Maximum Price - click to sort by maximum price
-
Pencil - click to edit sales item
-
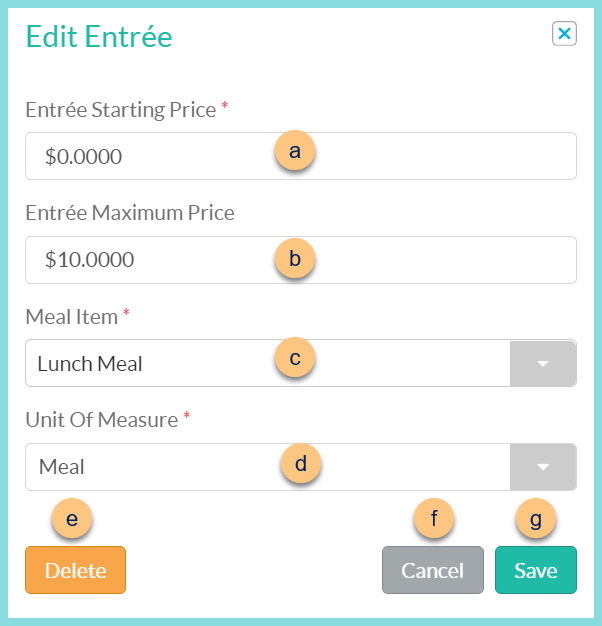
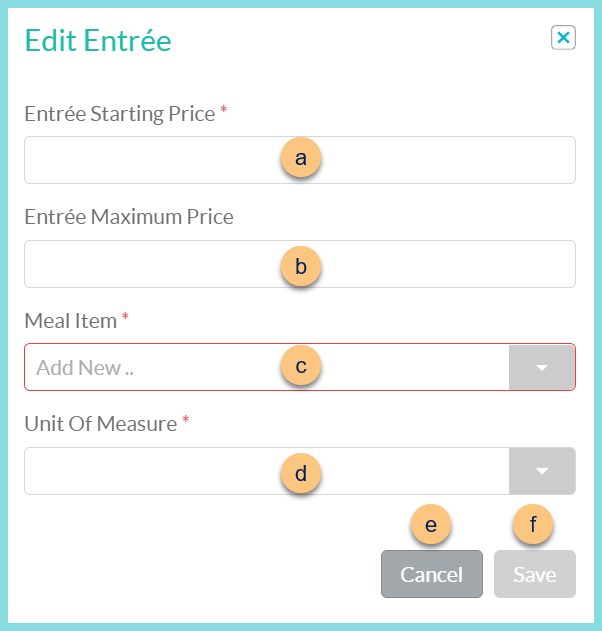
Entree Starting Price - enter the lowest sum of item prices that will become the selected entree
Note: If the items selected have a sum of price below this threshold, the respective individual prices will be charged rather than the meal.
Recommended: $0.00
-
Entree Maximum Price - enter the maximum sum of item prices that will become the selected entree
Note: If the items selected have a sum above this threshold, the respective individual prices will be charged rather than the meal.
Recommended: $10.00
-
Meal Item - select the sales item that will be sold if the thresholds are met
-
Unit of Measure - choose the sales item's unit of measure
-
Delete - click to remove item
-
Cancel - click to return to the previous screen without saving changes
-
Save - click to save changes
-
-
< > - click to scroll through pages
-
(+) New Entree - click to add a new sales item (This is the item that will automatically rung up if the criteria are met)
-
Entree Starting Price - enter the lowest sum of item prices that will become the selected entree
Note: If the items selected have a sum of price below this threshold, the respective individual prices will be charged rather than the meal.
Recommended: $0.00
-
Entree Maximum Price - enter the maximum sum of item prices that will become the selected entree
Note: If the items selected have a sum above this threshold, the respective individual prices will be charged rather than the meal.
Recommended: $10.00
-
Meal Item - select the sales item that will be sold if the thresholds are met
-
Unit of Measure - choose the sales item's
unit of measure
-
Cancel - click to return to the previous screen without saving changes
-
Save - click to save changes
-
-
Meal Components - notice meal components
-
Minimum - click to sort by minimum
-
Maximum - click to sort by maximum
-
Pencil - click to edit meal components
-
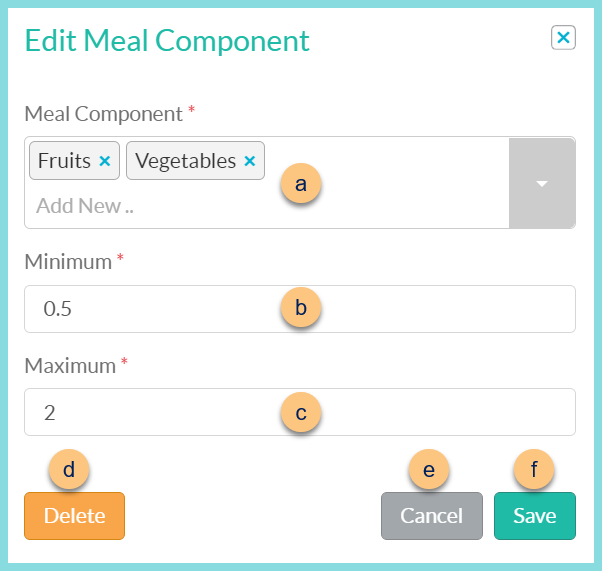
Meal Component - select one or more meal component (Meats/Meat Alternates, Grains, Grain Based Desserts, Fruits, Fruits and Vegetables, Vegetables, Milk)
-
Minimum - enter minimum quantity required for reimbursable meal
Note: If items are below this threshold, the item(s) will be charged at the individual price(s)
-
Maximum - enter maximum quantity allowed for reimbursable meal
Note: If items are selected above this threshold, the allowed amount will become the selected reimbursable meal, and the overage will be charged at the individual price(s).
-
Delete - click to remove meal component
-
Cancel - click to return to the previous screen without saving changes
-
Save - click to save changes
-
-
< > - click to scroll through pages
-
(+) New Meal Component - click to add a meal component
-
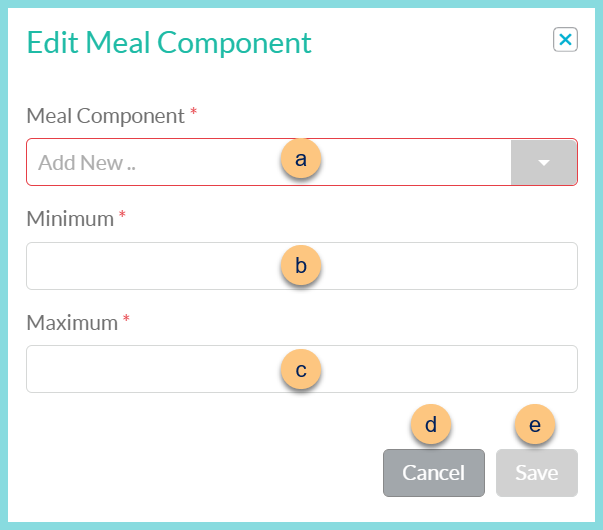
Meal Component - select one or more meal component (Meats/Meat Alternates, Grains, Grain Based Desserts, Fruits, Fruits and Vegetables, Vegetables, Milk)
-
Minimum - enter minimum quantity required for reimbursable meal
Note: If items are below this threshold, the item(s) will be charged at the individual price(s)
-
Maximum - enter maximum quantity allowed for reimbursable meal
Note: If items are selected above this threshold, the allowed amount will become the selected reimbursable meal, and the overage will be charged at the individual price(s).
-
Cancel - click to return to the previous screen without saving changes
-
Save - click to save changes
-
-
Active - toggle active status
-
Delete - click to delete individual meal combining configuration
-
Close - click to return to the previous screen without saving changes
-
Save - click to save changes
Example Meal Components
USDA Lunch Meal Components
| Meal Components | Minimum | Maximum |
|---|---|---|
| Meats/Meat Alternates | 0 | TBD by district based on largest reimbursable entree size |
| Fruits, Vegetables | .5 | TBD by district based on maximum amount of fruit/vegetable a student can take as part of a reimbursable meal |
| Grains | 0 | TBD by district based on largest reimbursable entree size + additional grains |
| Grain Based Desserts | 0 | TBD by district based on largest reimbursable dessert size |
| Milk | 0 | 1 |
USDA Breakfast Meal Components
Note: USDA requires 3 ITEMS at breakfast, but only 1 component. TITAN does not yet support this feature. For now, districts will need to train the cashier to ensure that the student has 3 items prior to completing the breakfast transaction.
| Meal Component | Minimum | Maximum |
|---|---|---|
| Meat/Meat Alternates | 0 | TBD by district based on largest reimbursable entree size |
| Fruits, Vegetables | .5 | TBD by district based on maximum amount of fruit/vegetable a student can take as part of a reimbursable meal |
| Grains | 0 | TBD by district based on largest reimbursable entree size |
| Milk | 0 | 1 |